- © 2026 Encircle Inc. All rights reserved. Refer to our privacy policy for more details.


Documentation Excellence for Restoration Teams

Ready to level up your documentation?
Book a demo to see how Encircle helps teams capture documentation to reduce friction and speed up approvals.
Documentation excellence is the foundation of profitable restoration, because every dollar you get paid depends on your ability to show:
What happened
What you did
How you followed standards
Why you did it


What does your team need to do to get the best scope output?
Encircle Scope is only as good as the data behind it. This cheat sheet walks your team through the three-step workflow — tell the story, document as you work, and refine and rerun — so every job file gives Scope what it needs to generate accurate, defensible scopes that hold up at estimating time.
Download the Encircle Scope Best Practices Checklist here:
Is our documentation strong enough to support accurate scopes?
Your scope is only as good as the documentation behind it. In the Ready, Set, Scope webinar, Encircle’s product and content leaders walk through real-world examples showing how visuals, audio narration, and written facts work together to create defensible mitigation scopes.
Ready, Set, Scope — Webinar Highlights
Documentation Excellence Workshop
A practical, hands-on exercise to run with your team:
Review real job files
Score your documentation quality together
Commit to improvements that lead to better scopes and stronger margins
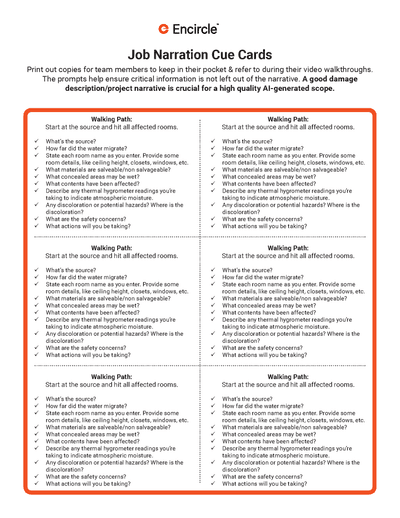
How can technicians capture a perfect damage description every time?
A good damage description/project narrative is the best cheat code for getting high quality AI-generated scopes.
These printable, pocket-sized cue cards guide technicians through clear, consistent walkthrough narrations—ensuring critical details aren’t missed while documenting a loss.
How can I train my team on documentation excellence in Encircle?
Encircle’s Documentation Excellence Live Trainings are instructor-led sessions designed to help teams build better documentation habits, align on standards, and prepare for modern, AI-powered scoping workflows.
Documentation Excellence Live Trainings
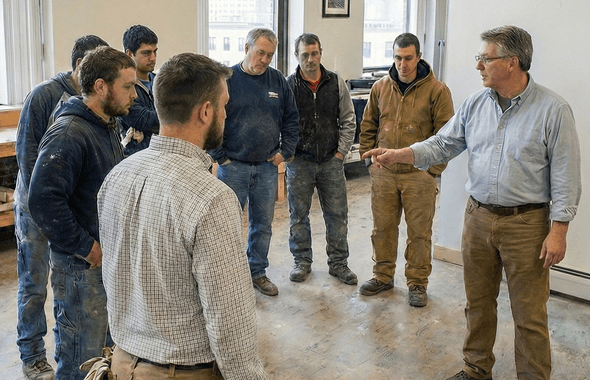
Tactical Operators treat documentation as an operational system — a repeatable, field-ready discipline that closes the gap between work performed and dollars collected. Explore resources below that help your team document jobs clearly, consistently, and with confidence.
Build
better files
Protect
your scope
Get paid
faster
Reduce
friction
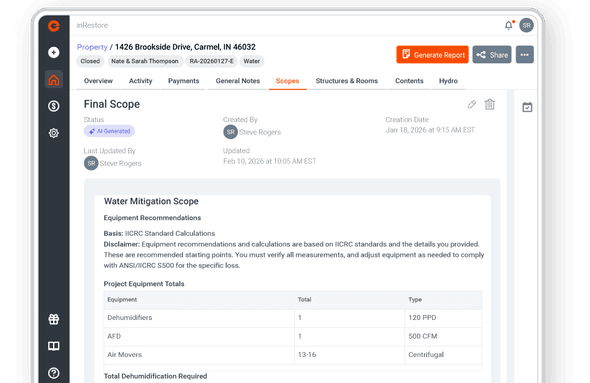
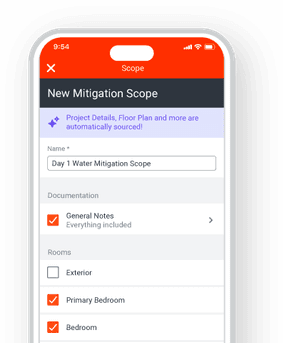
So let's see a scope. Enough of enough of this slide, Shaun. Let's just get right to the the heart of the presentation. So here's a job that we did here at Encircle. Really simple kind of category one, water loss. I'm gonna highlight kind of the data that we have in this claim before I go right right into the scope. So if I jump over to a general note so what we did on this job and this is kind of a complete job that we've ran through. And you can kinda look at this time stamp. This was done in late January. But the loss started kind of on the Sunday. We got there on the Tuesday. So we created a note that gave us the job description, the damage description. We kinda outlined a whole bunch of information on it. As the job progressed, we added general notes to this job to talk about the things that have been done. So some of this is standard practice for some of our customers. Some of this is best practice to help track how how the job goes. From a core data perspective in terms of what happened on the job, we did do a floor plan of the space. So this was a single level house. Kind of this is the property. For your benefit, what happened in the loss was the supply line here burst into the into the bedroom here and kind of affected the back half of the house. So that's kind of the loss that we're describing we're describing here. With that, these are all the rooms that were in the property, including rooms that were unaffected. We did document that. That's not something that always has to be done, but we did document that for for our benefit. But, really, if I go into kind of the primary bedroom, this is where the most of the damage was, and it seeped into those other rooms, the bathroom, the hallway, and the back bedroom. But we took photos throughout the job. So these are photos towards the end of the job where we had equipment on the project. But, really, we did the initial inspection. We did our overview photos from from each room. We did do a three sixty photo, of the room, which is a great way to provide overview data and kind of other other information. So with that, we've kind of repeated that process for each of these rooms. We added notes in each of the rooms both on day one and throughout the job. So once you've done that, once we've done kind of we did this, we did initial inspection, we did a final inspection. I'm gonna show you the scope at the end of the job. But in Encircle, what we're doing now is on web, you can see here that we've now exposed a new tab where you'll see a new tab, which is Encircle Scopes. And we have a page that will list out all the scopes that are generated. To, to generate a scope, when we talked about, we didn't want to disrupt and interrupt the work that you normally do. So all you need to do now to generate a scope both on web and mobile, and I can show mobile in a minute, is once there's data on this claim, you essentially click generate a new scope. Here, you can see all of the structures and rooms that are on the job. If you have multiple structures, we will highlight multiple structures. We preselect everything on the job. But if you wanted to remove some of the rooms that weren't affected or you may use a room for instructions, you can deselect and remove them from from the job itself. We won't take any of that data. And if there's general notes that you put in there, sometimes you may have a note in there around here's the garage code, or information about other contacts on the job. You can deselect that, and that will go into it. So once you've done that, once you've selected structure in the rooms and you selected the general notes, all you do is hit generate. Of course, you have to put a title. Our UX, make sure there's a title. So let me put this in here. It should scope. And then generate. And then it's off and generating. So this and we'll talk about this later, but this job had a video walk through on it as well. And what's happening is we will pull out the transcript from that video, and it gets used to reinforce everything that we put in the scope. Once the scope comes back, and what we've been seeing is less than ten minutes on our jobs, those scopes will be returned. Now let me jump into what it actually looks like. So this new section, we have this new item called the Encircle Scope, which is essentially a document within within Encircle that will outline, the core project information that we wanna talk about. Before I get there, just so you know, this is a completely editable document if you need to. So you can review it, but you can actually go in and edit this document. So if there are things in here that you need to add or you need to cross reference or you need to change or you want to remove, you can go in here and simply start adding text in there. We've introduced tables in the Encircle so you can actually add additional rows if you wanna add additional rows. So you have the full ability to take this scope and manipulate it as you need to for that job. Now I'm not gonna go through how we how we edit it, but I just wanna let you know that you have complete control over the output of this. Review it. Change it up as needed. So the outline of the scope is pretty straightforward. In the beginning, we have this narrative project section. We talk about the timelines on the job. So when was the, loss date? When was the time since intrusion? When work started, you know. We pull all this information from whether using job events or from the time stamps and and metadata on each of the photos and videos and notes. We have a quick summary of the project information, what was the source, what was the class and category of the water, and some of the spatial and dimensions, like, what was the square footage? And on square footage, I'll talk to that. If if there isn't a floor plan on the job or if you haven't noted down dimensions, that's okay. You can continue to use Scope. We're just gonna highlight that there were no dimensions. And if you add dimensions, you'll get a more robust scope. You can see here I got a little toast. That scope that I just started generating about two minutes ago has already completed. So we pretty quick to generate these things based on all the data in the job. The next thing that we have is kind of a narrative of the project itself. What's a quick summary of based on the information from your notes and what we've parsed out from the video transcript, from all the photos, from Hydro information, you know, what happened on this job? And this summary is really good that if you need to produce a twelve hour or twenty four hour report to send to a carrier, you can simply copy and paste this and add that to your report or add the scope itself to a PDF report that you can use. Next, we get into what we think is the most important part, which are the tasks. And we've broken this down into project level tasks. So So if you're used to using Xactimate and you create kind of a general folder for kind of the high level tasks that don't belong in any specific room, these are the tasks that align to that. So whether it's was this emergency service or are there after hours? Did you need floor protection? Kind of all these gen general things that you should and could apply to your estimate in the project. Then the language that we use, while it's not a specific Xactimate code or anything, we are using kind of the right language that you and our industry are used to when we talk about these line items. So when you need to go and create that estimate, these line up perfectly with what you would actually use in Xactimate or other software. Now we get into the heart of the scope, which is the room by room breakdown of all of the affected rooms. So we provide a quick summary of what happened in this specific room. We call out any dimensions that were specific to that room and where they came from. We have affected materials that we pulled out from not only notes in the photos, but from Hydro data. If you created a moisture point, we use that information to cross reference and validate and verify materials that we call out here. And then for each room, we call the specific tasks based on the narration and all that data that we feel need to happen in this room specific to the mitigation of that of that job. And then we go and repeat that for every single room that was identified as affected within the within this project. And if this isn't a simple copy and paste, each room is analyzed independent, and you'll see very specific details. So for instance, in this one, this is the primary bedroom where the loss happened. In the launch in the video, we talked about, oh, we need to detach the big sports from from the job and use it. We parse that out looking at floor plan. We saw the square footage of that room, and we added detached baseboards, and here's a linear square footage from that from that information. So really synthesizing that data and producing this output to help you, you know, tell your team what you need to do. Hey. Make sure we remove those baseboards, and then use that for your estimate once you go to create it. And, again, we repeat this on and on for each of the rooms that were on that job. We also list out any unaffected areas as well just to highlight based on the information whether they were only in the floor plan or we've pulled it up from other sources. Here's other data that was on the job that we don't feel is impacted by this loss. And if you provide us dimensions and we know it's a water loss, we will do kind of the s five hundred equipment calculation for you. We will group the rooms in the drying chambers. If you use Hydro, that data goes in to help us organize the rooms into drying chambers as well. And we really call out, you know, how much how many dehus and air movers are needed at the project level, but then we go and break down the air movers per room based on what we need what is calculated from the S500. We highlight placement suggestions on how to place the equipment in there. And then the kind of last section is really the IICRC references. So whenever we've quoted and calculated the category loss or water loss or other information, we call out the specific sections of the s five hundred or the s five twenty or s seven hundred and highlight this here. So you can use this information maybe as F9 notes in Xactimate to justify certain line items that are there as well. And lastly, we have a data quality note section, which will kind of information from our system to you on here's where we pulled some data, here's some data that we may think is missing. So for instance, if there was no plan and there's no dimensions, we'll highlight, hey. You were missing some floor plan and dimensions. So this is really, like, incredible that within three minutes based on the work you already have to do, which was calculate or which was document the room, we've produced and provided this scope. And this all lives on mobile as well. So if I go into mobile, you can see this scope. Here's the one that I just generated, and you can review and edit that. So if you wanna do it in the field, you can do it in the field as well.
Great. Thanks, Shaun. So one of the things that Shaun has talked about is and and I mentioned it at the beginning, is that the scope output the the quality of the scope that you get is really dependent on the data that is available in the file. We prioritize accuracy. If the data is not available, we will not make assumptions about that project. The people on-site capturing the data and the context of that project, that is key. They are the ground truth for that project, Encircle Scope is never going to invent things. It is going to call out in the scope where data was missing or unavailable. That is a key differentiator for what we're doing here versus doing something in a in a traditional, like, ChatGPT or a chatbot where you're asking it to produce a scope. It's priority like, ChatGPT's priority is a complete answer, and it's really good at writing. So chat it's gonna give you a really beautifully written scope, but it's gonna throw it it might throw a bunch of details in that it's made assumptions about based on data that was unavailable. So all that to say, how you get the most accurate data starts in the best app for field documentation, which for for almost fourteen years now, Encircle has been the most trusted field documentation platform for restoration contractors. It is easy to use, it's reliable, and it contains all of the possible tools that you could need to document that the context and data that needs to be documented on that job to justify your scope of work, which is what we did in the past. We would create really great reports with all of this data that helped you justify your scope of work. Now we're taking all of that data and putting that data to work for you, and actually creating that scope of work for you. That using this app that actually works in the field, it's a field first solution, it's easy to use, Technicians love it. That's why we've, you know, been around for for as long as we've been around. And it includes things like all your photos, your videos, including three sixty that we introduced last year, all your water mitigation, so moisture readings, drying chambers, dry standards, psychrometric, all of those things in Hydro, Contents, all of your notes, your floor plans. Shaun talked about measurements. Measurements are critical to to finding scope and adding those quantities and square footages to to the scope. So you want we have floor plans in there. Obviously, we can create detailed reports, and we have additional platform, things like payments, custom forms, and the ability to talk to your to your end users. Shaun, if you wanna go to the next slide. But I I think it's really important that we talk about what is the critical documentation, that key documentation to produce an incredible scope. What are those sort of the the bare minimums? What are the standard operating procedures, the SOPs that your team should be doing on every loss so that you can get the best scope possible? And then it really boils down to four things. The first one is a description of the loss. And what Shaun and I are gonna do over the next ten or fifteen minutes is go through each of these four items and talk about how the different ways that you can get that data into Encircle. It's not, oh, it's not a specific process that you need to follow. There's a couple of different ways depending on what works best for you. So the first thing that we need is a good description of the loss. The second thing is measurements. Getting measurements into the app or into the scope is is important for generating equipment calculations and for quantities and things like that. Without measurements, we won't do we won't provide those things. We won't make them up, but we just will will leave them sort of blank with a caveat that we didn't have measurements. We can't do this. Photos, of course, are important important. We're gonna look at photos. We're gonna use our image analysis to verify and validate against the description and make sure that everything makes sense. We're gonna use gonna extract materials and identify different materials. We're gonna identify fixtures that are that are in there and just make sure that everything is cohesive and synthesized and makes sense. So photos, of course, are are important. And then that room specific information. When you get into writing your estimate, the estimates are written room by room, and we wanna make sure that we're breaking down those tasks into into room those that room specific information. And so the most helpful thing is to use the Encircle app as as intended and create those rooms and put all of that room data into into those rooms specific in into those rooms specifically. So let's go through each of these one by one. Before we get to that, we have put together an incredible resource for you. So we've put together this page, a documentation excellence resource for restoration teams. It includes a whole bunch of really great checklists, templates, cue cards, everything that you need to really level up your team's documentation in Encircle. I wanna point out specifically the template for the documentation excellence workshop. It's linked from this page. It's a really great, workshop that you can run on a production meeting or a, you know, a weekly meeting with your team and just assess where you're at. See where you're or at with your baseline documentation today. Implement some new things and see where you're at a couple of weeks from now and see if you can improve the the documentation. There's also a link to register for some live trainings, and we'll provide that link, at the end of this course as well. So just a really great resource if you want, to help your team level up their documentation. So we talked about providing a a good damage description or a description of what happened on that property. And the gold standard, the way that we really encourage everybody to do this is through video. Do a video walk through. Now I should mention, we're not gonna use the video itself, as part of the scope. We're not using any sort of video analysis. What we're gonna do is extract the the transcript from that video. But why we encourage a video walk through is show and tell. We've been doing show and tell since we were in kindergarten. Right? So you wanna walk the property, provide your expert narration. Tell tell the phone, tell tell the tell everyone what's going on in that property. What do you see? What do you hear? What's going on? And provide that additional expert level of context and detail, and that's gonna we're gonna take all of that rich contextual information and improve the scope accuracy. So make sure you're giving an overview of the situation, the source of loss, describe how the water migrated throughout the property. Go into each of the the rooms that were affected, and talk about the resulting damage, give an overview of how the room was affected, the impacted materials. One of one of my colleagues, he talks about, you know, AI is again, it's an it's an amazing tool, and image analysis is so great. And you can, you know, use Google Lens, and you can use your iPhone to, like, identify flowers and stuff. But when it comes to water mitigation, dark carpet in a picture looks the same whether it's wet or whether it's dry. AI can't know if that's wet or dry. The person on the site is gonna be the one that can provide that information. So if you go into the primary bedroom and it has dark carpet, you wanna say the carpet is saturated. That's a that's a key piece of contextual information along with other things that are in the file that are gonna help build that build that scope. Other things to include in that in that walk through, safety considerations, so any potential hazards that need to be considered like mold, asbestos, lead, anything like that. And then describe the next steps. Describe the initial steps that are needed to mitigate the loss. So to get that damage description, best practices is a video walk through. There's other ways to do it. This is just the one that that we would encourage you to use. I'm gonna Shaun's gonna give an example of of one that we've that we really like. Yeah. I think we should, you know, do what we say and do a show and tell us. This is a this is a video of that we have on that file that I just showed you that Joe and our team walked this job and narrated it. So we'll play it's a two minute video. We'll play we'll we'll just play a portion of it. But when creating this video, it's important where we think best to do that is find the room where the source happened, where the loss happened, and start there when you start your video. And then you can leave that space and then start walking. You'll see Joe do that kind of in this in this job. Alright. Let's go ahead and capture the damage. So we're in the primary bedroom. Source of loss is gonna be this wall over here. What we have is we have the supply line that has become damaged in the wall, wet the carpet. As you can see, we got baseboard, drywall, and some contents. Scope of work, we're gonna need to extract the carpet, lift the carpet out, potentially remove the padding. We're also gonna have to detach the baseboards and manipulate this furniture. In the next room, we have a little bit of hardwood floor in the hallway, and it appears that the wall So I'll pause there in the video. So we talked about as he left the primary bedroom so when he entered the room, he called out the name of that room. And that way, we can take that transcript and that data. So when Joe says primary bedroom, we can align that with in the file, we had a room called primary bedroom with a whole bunch of photos. So that allows us to match these things and increase our confidence as we justify and validate the scope. And he said the same thing that when he left the primary bedroom and entered into the hallway, he called out the hallway, and then everything he speaks about that we can then use. So it's pretty pretty powerful. Like Leah said, this is one of many ways to add the job description. You can create a note. You can use the speech to to text part of iPhone and Android or do a video. We think the video works works quite well. And moving on, I think I think we got that one done, Leah. We can move on to measurements. We did. I just I do wanna answer one question that was in the chat before I before I lose track of it. I just wanna remind everyone, if you do have a question, please throw it into the Q&A box, or I will lose track of it. But I think there was a question asked specifically about video, and I wanna address it now. So are the video is the video analysis only in English, or can we also do it in Spanish? I think it's important that you can and, Shaun, correct me if I'm wrong here, but you can do the video walk through in English, French, or Spanish. That's correct. Yep. And we will we will and and we will absorb that information into Encircle AI and into the scope, and you will get that info that insight into the into the output as well. So walk in your walk and talk in your in your preferred language. And and just following on language, so that's completely correct there. We detect the language of that video. The transcript is done in that language. We will bring it into, you know, the computer language that it needs to parse it out and then produce the output. The scope can be done and produced in English, Spanish, or French similar to some of our other functions in Encircle. Depending on the browser language of your Chrome browser is set to French, the scope output will be French. If it's set to English, then you'll get you'll get English as well. K. Okay. One of the next key pieces of data that we need for scope is measurements. Now, again, it's a key piece of information to get an incredible scope. If you don't provide measurements, you'll still get a good scope. They just won't have those quantities and and square footage and and measurements, and you won't get equipment calculations and things like that. So best practices to get an incredible scope, a really useful scope, is to provide those measurements in the app. So there's a couple of ways you can provide those measurements. The gold standard, the fastest and easiest way to do it is to use to do an Encircle Floor Plan. And Shaun's gonna talk through some of the best practices for capturing and making sure you're getting a really good floor plan. But some other ways that you can that you can get measurements into the app, if you're using Hydro on a water job and you're and you're adding room dimensions into into your drying chambers, we're gonna we're gonna take that information in. If you have a floor plan and hydro, that's just extra data. We're gonna we're gonna look at that information, and we're gonna compare and contrast and synthesize and make sure that everything makes sense and matches up and aligns. So you can use Floor Plan, can use Hydro, or you can put it in a room note. Room dimensions into a room note. So go into that room, throw quick a quick quick room note and enter the dimensions, and we'll add we'll add the that that information into the scope as well. So measurements, not absolutely required to get an output. You still get an output without measurements, but to get, you know, the best version of Scope and the most useful version for you is to make sure there's measurements in there in some form. Yeah. And think as Leah said, like, Floor Plan is is the gold standard. I'll I'll show a video of it quickly. So here's kind of a best practices that we have on how to get the most accurate floor plan possible. So this is one of the videos that we have in our learning hub. Please go out there and get lots of information on not only how to do a floor plan, but how to use Encircle and all the features that we have. But here's a quick walk through of, like, the best practice of performing the scan and walking the property. When it's time to scan, remember, your phone can't do all the work on its own. You need to move your feet. Don't just stand in the doorway and pan your phone around. Step fully into each room and walk along the perimeter. Move around beds, furniture, and obstacles so your camera can see every wall and corner. Think of it as taking your phone for a walk. You're showing it the space. Here's a simple mental check. Make sure your right shoulder has walked past every wall in the room. If your right shoulder hasn't passed it, your phone probably hasn't seen it. Try to stay about three to six feet away from the walls. That's the ideal range for capturing accurate data. Right there, I think the biggest trick when, you know, we've launched this is it three years now, Leah? It's been quite a while since we've put Floor Plan out there. But that keeping in mind, if I can just walk the perimeter and keep my shoulder against the wall, and if there's a couch in the way, go around the couch and kinda try to get back to that wall. If there's a bed in the way, that will essentially kind of paint the entire space with the video and allow us to then take that video and analyze it and produce produce the floor plan. And that I think that's like, that has really helped me ensure that every floor plan that I do has, like, high high high accuracy to it. And as Leah said, like, dimensions are really important to get a, you know, as accurate and more complete scope. But, you know, to do the floor plan, know, think we're under six hours that you'll get the floor plan back. If you wanna get a quick scope of work done on that day one after the initial generation, run that scope first. Do it and get that kind of initial scope without the dimensions. Once that floor plan's back, you're able to run it again on the job, create a second one, and and make it more, more complete. Next, we'll talk about photos, our core bread and butter of Encircle photos. Right, Leah? Oh, you're muted, Leah. Alright. There we go. Okay. Yeah. Photos. It's our bread and butter. Butter. Everybody knows if you didn't document it, it didn't happen. Photos are so important. And in Encircle, we give you the opportunity to capture as many photos as you need, including three sixty. So that visual documentation provides the justification of what's been written and said about the job. We are not going to make assumptions, though, based on just the photos alone. So, again, I'm gonna continue to reiterate that providing your expert human commentary, your restorer expertise, what you see, feel, hear, smell on that job needs to go into that into into the job. So but photos are are critical to providing some of that that visual evidence and validation for what what is being written and said on that job. So definitely create those rooms in Encircle. By creating the rooms, that's gonna help to keep the data organized and match what's happening in the real world. We highly recommend integrating your Ricoh three sixty three sixty cameras with Encircle. It's included in your subscription. You don't have to pay any extra for it. So to cap, it's a really fast way to capture an overview of each room. Then capture those detailed photos of specific damage provided. Show the equipment in place. Show the baseboard. Show any mold that you find behind the walls. All of those things are going to provide the validation to what you've already provided in the context. You can mark up your photos. So if you want to highlight a specific area, Encircle Scope is gonna look at the markup that you've done on that, and and and it's gonna flag that, oh, there's something extra important in this photo that I need to that I need to look at. So to provide even even greater amount of detail and context. Yeah. And if we look at, like, the the sample job that we've been walking through for this entire job, I'll show it up on my phone here is so this is the primary bedroom, and we have photos throughout the job as well. So remember, you can run the scope as the job progresses. So do that initial scope on day one, understand what happened. As you can see here, we had photos of the meters as well as photos of the meters within Hydro. We have three sixty is a great way to show the overview of each of of each of those spaces. You can do that right here in Encircle. And one thing that I like about kind of using our app for photos is when I'm taking photos, we've tried to make it really easy for you to to not break what you're doing. So within the camera, you can take photos of each of the rooms. You don't actually need to leave the camera as you move the space. So if you wanna focus on, I need to take all the photos of the affected spaces. As you leave that primary bedroom and walk into the hallway, simply select the hallway. You can see it's highlighted at the top. As you take photos now, it goes straight into that room. So you don't even have to leave the camera to, you know, stop what you're doing to take photos. And the same thing with three sixty. You can bring your Rico with you, put it in the middle of the room, capture that photo, go back to taking overview photos, damaged photos, and then move all that equipment to the next room without leaving the screen. You can just switch rooms. Again, we've just tried to make it really easy and efficient for your team to capture those that data and those photos for, for the job. Great. And last but not least, our Notes and Note templates. So we I talked about the the video walk through as sort of the gold standard for capturing that description of the loss, the providing that damage description. But Notes are another great way to do that as well as note templates. So giving those clear and consistent notes, whether that's upfront at the beginning or daily sort of progress updates throughout throughout the job. You can provide extra room date details, so information about, you know, how the closets that were in there, windows, doors, safety hazards, things that help reinforce what you've provided in the video walk through. I'm not gonna go through all of these, but I wanna specifically hone in on the the note templates. So this is a feature that we introduced several years ago now, but it gives you this an ability to create sort of a standardized template for your team of things that you might want them to provide on every job. So maybe it's a daily progress update. What did you do at the end of the day? And you provide specific list of things, and they they just need to fill in the blank. So Shaun's gonna show you some of these things, but leveraging Notes, again, it's gonna give us that opportunity to ingest that that really rich contextual information that you provided from your, you know, human in the loop expertise to generating a a more robust scope. Yeah. And I think the the power of Note templates, similar to the power of Scope, is providing consistency from every job and whoever is on that job. So, you know, here's an example of kind of the general notes on that job where we have a note template for a daily checklist that needs to go through. So for somebody to use it, they can go into general notes or go into the specific room that they want. They can create a note, hit the template, and then they'll pull from all the templates that you've set up in your job. We introduced rich text last year, you can create, checklist. If I look at kind of a completion checklist that who did that final walk through of the job, did they remove all the equipment, was the COC signed. Super easy for someone to know what they need to do on that final checklist. Or if they're trying to, you know, start the job and do that initial investigation, we'll just replace that, you can see here that we've added that information in here, and they can just, they know exactly what they need to fill out for that job description in addition to everything else we do. So it really just helps drive consistency and ease of use for your teams in the field. I think the last thing, Leah, that we wanna talk about is, is Hydro. Yeah. And, Shaun, I'm just looking at the time. We've only got twelve minutes left. So I think if we just I'll give an overview of Hydro, maybe add some context, maybe you don't show show the app. But Hydro data is is additional context that can be used by Scope to drive accuracy and validation. So if you are using Hydro, it's the it's the water mitigation tool, the checklist to documenting water water jobs, so psychrometrics material readings. We have an equipment calculator in there, gives you alerts and notifications. But Scope is gonna use this to validate the the other things that are seen in there. And, again, if you put measurements into Hydro, it's gonna take those measurements in. If you put the source of loss into there, that's that extra context that it's gonna provide. I talked about that, like, wet carpet, dark carpet being wet versus dry. If if the if you didn't mention it in your damage description and there's only a picture of carpet, the visual analysis isn't gonna know if that carpet is is wet or dry. But you may have entered a moisture point in Hydro that shows that the carpet is completely saturated. So it's gonna give that extra level of detail and information in that room, in that drying chamber to validate where things are affected and what needs to be done. Anything else you wanna add there, Shaun? No. I think you've you've topped it. It's just, again, it's additional context to help create the most accurate scope that we can create based on the data on that job. Awesome.